User manual of the TAT GUI
Starting the application
Before starting, make sure you installed it using this guide. If you are running on Windows, an executable file called tat.exe should be available in the start menu. If you are on Linux, follow these steps.
If you want to start the application with a command prompt, you need to execute the following command:
python -m tat
Note
If your python scripts directory is in your path, you can simply write `tat`.
Main window
Container frames
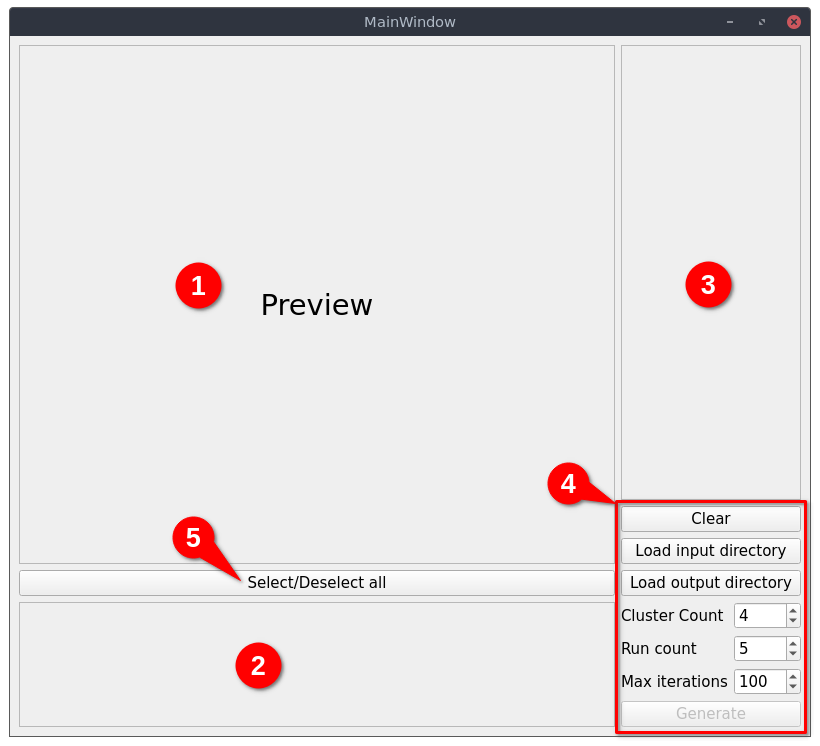
There is 5 distinguishable areas:
The preview frame: this is where the selected image will show up when the user select both an image or a cluster.
The source frame: this is where all thumbnails of input images will show up. A thumbnail is a clickable widget that will preview the corresponding image in the preview frame, it can also be checked implying that the image will be processed by the clustering.
The clusters frame: this is where all the processed clusters will show up as thumbnail. In contrast to a source thumbnail, this one cannot be checked, but the user can double-click on it to open the cluster editor.
The clustering parameters: this is a list of options you can modify in order to match your configuration and the input/output directories.
The Select/Deselect button: this button will select all the source thumbnails if at least one thumbnail is unchecked. Else it will uncheck all thumbnails.
Clustering functions
In the right bottom corner (in the red rectangle labeled as 4 on the screenshot) there is a list of button and fields that are associated with the clustering area (3). Here is a list of the functions of each button and field:
Clear: clear the clustering area (3 in container frames)
Load input directory: open a popup to select where the directory containing source images are located
Load output directory: open a popup to select the directory where the clustering will be saved.
Cluster Count: specify how much clusters you want to generate for each image, i.e. the number of output layers
Run count: specify the number of run the algorithm must be run. Default is 5, you can increase if you need more precise results, or decrease if the computing time is to high
Max iterations: specify the maximum number of iterations the algorithm must be run. Default is 100, you can increase it for more precise results, or decrease it for faster execution
Generate: this button will start the computation algorithm for clustering. It may take a while, and a progress bar will show up to indicate to the user the progress of the program in the task. You can cancel the clustering by clicking on the Cancel button below the progress bar.
Cluster editor
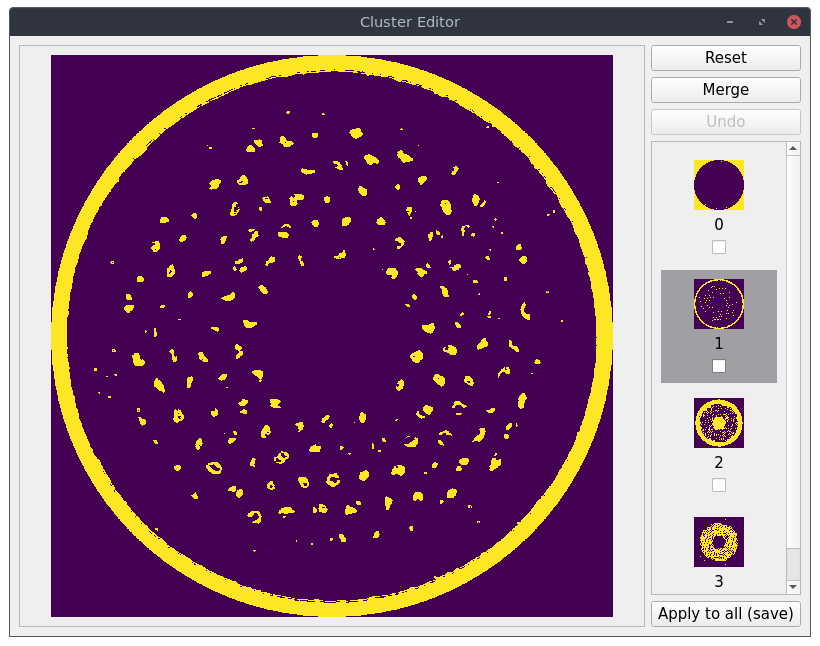
There is three main areas:
The layer prevew which show the selected layer
The layers scroll area which list every layer thumbnail, where you can click on each layer and mark as checked by clicking on the box below the layer thumbnail.
The buttons:
Reset: revert all the changes applied to the current cluster until the last save (or to the original state if none modifications has been applied)
Merge: merge the checked layers together, delete them and create a new mergers layer
Undo: revert step by step each modification done to the current layer, until the last save (or original state). The button is disabled if there is nothing to undo.
Apply to all (save): apply to every cluster the modifications applied to the current cluster, e.g. if the current cluster has layers 2 and 4 merged, all the clusters will have layers 2 and 4 merged. If you leave the cluster editor without clicking on Apply to all, all the changes will be discarded.
There is a window at the left of the cluster editor showing the current cluster state. At any merge, reset or undo this preview will be updated, but you need to click on the Apply to all button to save the current configuration.